Cisco provides a custom ESXi Image/ISO to (re)install Hyperflex Servers. As i’m currently working on fully automating the deployment of a large quantity of there servers, i looked for a way to automate the reinstall of these Hyperflex Servers.
Unfortunately the ESXi Image provided by Cisco requires a confirmation at some point, i wanted to get rid of this. First i downloaded the current ISO file from Cisco (HX-ESXi-6.7U3-16316930-Cisco-Custom-6.7.3.5-install-only.iso).
Create the Image
 1
 2
 3
 4
 5
 6
 7
 8
 9
10
11
|
cd /tmp
mkdir iso
cd iso
mkdir ro_iso
mkdir custom
device=$(hdiutil attach -nomount ~/Downloads/HX-ESXi-6.7U3-16316930-Cisco-Custom-6.7.3.5-install-only.iso | \
         egrep '^/dev/' | sed 1q | awk '{print $1}')
mount -t cd9660 $device /tmp/iso/ro_iso
cd ro_iso
tar cf - . | (cd /tmp/iso/custom; tar xfp -)
cd ../custom
|
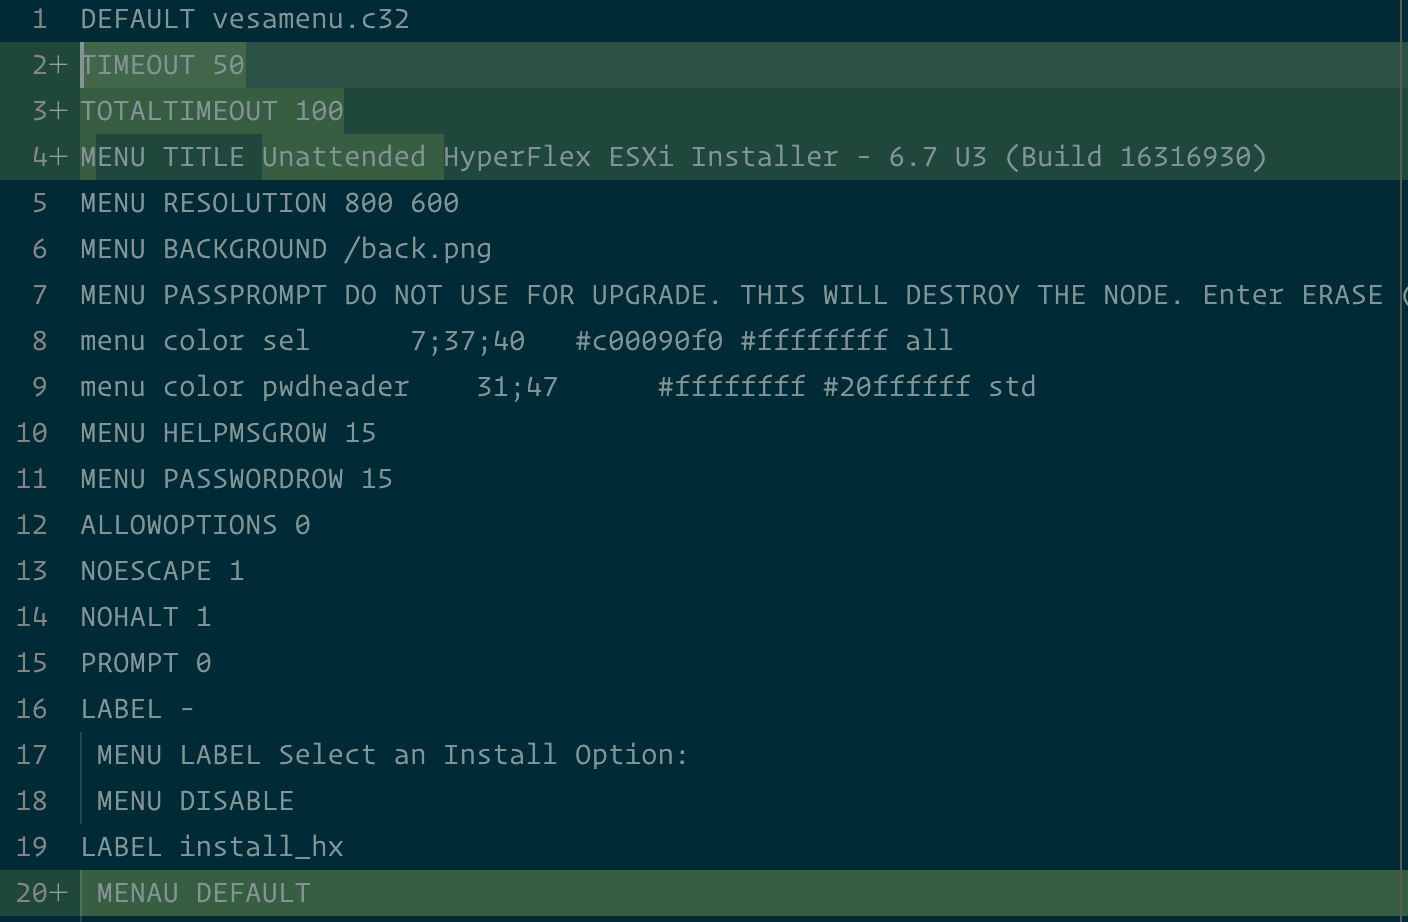
This mounts the original ISO to a new folder and then copies everything to another folder where we can do the changes we want. I changed the following in the ISOLINUX.CFG file.

You can find the ISOLINUX.CFG file i created here.
After that you build the image, i run the mkisofs twice to include the files that are generated bi isohybrid.pl (ISOLINUX.BIN).
 1
 2
 3
 4
 5
 6
 7
 8
 9
10
11
12
13
14
15
16
17
18
19
20
|
sudo mkisofs -o UNATTENDED_HX-ESXi-6.7U3-16316930-Cisco-Custom-6.7.3.5-install-only.iso \
  -b ISOLINUX.BIN \
  -c BOOT.CAT \
  -no-emul-boot \
  -boot-load-size 4 \
  -boot-info-table \
  -J -R -V "UNATTENDED_ESX" .

wget https://gist.githubusercontent.com/jsarenik/e184b4061263dbd7d3a3/raw/861da48e3f32138400cf966ca0d498e67575ce0d/isohybrid.pl
chmod +x isohybrid.pl

sudo ./isohybrid.pl UNATTENDED_HX-ESXi-6.7U3-16316930-Cisco-Custom-6.7.3.5-install-only.iso

sudo mkisofs -o UNATTENDED_HX-ESXi-6.7U3-16316930-Cisco-Custom-6.7.3.5-install-only.iso \
  -b ISOLINUX.BIN \
  -c BOOT.CAT \
  -no-emul-boot \
  -boot-load-size 4 \
  -boot-info-table \
  -J -R -V "UNATTENDED_ESX" .
|
After that your iso is ready. Cleanup
1
2
|
umount $device
hdiutil detach $device
|
How to use the Image unattended
You have now an image which doesn’t need any confirmation, but how to use it unattended. I put it on an http server from which it can be retrieved. Then i use the following snippet on the CIMC CLI to reinstall the server.
 1
 2
 3
 4
 5
 6
 7
 8
 9
10
|
scope bios
    set boot-order cdrom,hdd,fdd,pxe,efi
    commit
    exit
scope vmedia
    map-www ESX http://SERVERIP:SERVERPORT UNATTENDED_HX-ESXi-6.7U3-16316930-Cisco-Custom-6.7.3.5-install-only.iso
    exit
scope chassis
    power cycle
    y
|
